vitepress 构建静态网站
本文档参考vitepress官网
步骤1:简单的开始
安装yarn
sh
npm install --global yarn
1
安装后检查
sh
yarn --version
1
创建一个vitepress项目,进入项目
shell
mkdir vitepress-starter && cd vitepress-starter
1
初始化项目
shell
yarn init
1
安装vitepress和vue
sh
yarn add --dev vitepress vue
1
根目录下创建docs文件夹,在里面添加index.md作为首页。
将以下添加进package.json,用来启动服务
json
{
  ...
  "scripts": {
    "docs:dev": "vitepress dev docs",
    "docs:build": "vitepress build docs",
    "docs:serve": "vitepress serve docs"
  },
  ...
}
// dev环境端口默认5173,prd环境默认端口是4173,可以修改端口,例如"docs:serve": "vitepress serve docs --port 8080"
1
2
3
4
5
6
7
8
9
10
2
3
4
5
6
7
8
9
10
启动服务
sh
yarn docs:dev
1
步骤2:配置
在docs目录下创建.vitepress目录,在.vitepress目录创建config.ts,里面这么写:
typescript
import { defineConfig } from 'vitepress'

export default defineConfig({
    // <html lang="en-US">,默认en-US
    // lang: 'en-US',
    // 网站标题,在左上角
    title: 'ddd的文档网站',
    // 标题的后缀,string|boolean,如果设置为'aa',那么标签的标题后会加上|aa,设置为false表示这个属性不生效
    // titleTemplate: false,
    // 网站的描述
    description: '总结归纳学习中的知识',
    // true:显示切换夜间按钮,false:不显示,默认true
    // appearance: true,
    // 部署时写你的仓库名,比如ddd
    base: '/ddd/',
    // 类似html中head标签里的link标签
    head: [['link', { rel: 'icon', href: '/favicon.ico' }]],// 添加网站图标
    // 默认为false,为true时,不会因为deadlinks而编译失败
    ignoreDeadLinks: true,
    // git commit时获取时间戳,默认false
    lastUpdated: true,
    // markdown解析配置
    // markdown: {
    //     theme: 'material-palenight', // 语法高亮的主题
    //     lineNumbers: true, // 代码块加行数
    // },
    // 编译输出位置,默认./.vitepress/dist
    // outDir: './.vitepress/dist',
    // markdown文件存放的目录,默认是 . ,相对于根目录来说
    // srcDir: './src',
    // 主题配置
    themeConfig: {
        // logo:'/logo.svg',
        // 覆盖app级别的title属性,string|boolean,为false不加title
        // siteTitle: false,
        // 右侧目录,false时不显示目录,数字时代表只显示这个标题级别,数组是表示在区间内的级别可以显示
        // 'deep'代表[2,6],一级标题不显示
        // outline: [1,6],
        // 显示在最后更新时间之前的前缀文本。
        lastUpdatedText: 'Updated Date',
        // 右侧目录的标题,默认是On this page
        outlineTitle: '目录',
        // 导航栏配置,在右上角
        nav: [
            { text: 'Github', link: 'https://github.com/VictorGol' }
        ],
        sidebar: [
            {
                text: '知识点',
                collapsible: true, // 可折叠
                // collapsed: true, // 初始是否折叠
                items: [
                    { text: 'ajax', link: '/someInfo/ajax' },
                    { text: 'Go', link: '/someInfo/golang' },
                ]
            },
            {
                text: 'vitepress',
                items: [
                    { text: 'vitepress教程', link: '/someInfo/vitepress教程' },
                ]
            }
        ],
        // 显示社交账号,在右上角
        // 支持'discord''facebook''github''instagram''linkedin''slack''twitter''youtube'{ svg: string }
        socialLinks: [
            { icon: 'github', link: 'https://github.com/VictorGol' },
        ],
        // 页脚,没有侧边栏时才显示
        // footer: {
        //     message: 'Released under the MIT License.',
        //     copyright: 'Copyright © 2022-present ddd'
        // },
        // 点击可以前往GitHub编辑
        // editLink: {
        //     pattern: 'https://github.com/vuejs/vitepress/edit/main/docs/:path',
        //     text: 'Edit this page on GitHub'
        // },
        // 广告
        // carbonAds: {
        //     code: 'your-carbon-code',
        //     placement: 'your-carbon-placement'
        // },
        // 文档页脚,下一页和上一页的文本
        docFooter: {
            prev: '看看上一页',
            next: '看看下一页'
        }
    }
})
1
2
3
4
5
6
7
8
9
10
11
12
13
14
15
16
17
18
19
20
21
22
23
24
25
26
27
28
29
30
31
32
33
34
35
36
37
38
39
40
41
42
43
44
45
46
47
48
49
50
51
52
53
54
55
56
57
58
59
60
61
62
63
64
65
66
67
68
69
70
71
72
73
74
75
76
77
78
79
80
81
82
83
84
85
86
87
88
89
90
2
3
4
5
6
7
8
9
10
11
12
13
14
15
16
17
18
19
20
21
22
23
24
25
26
27
28
29
30
31
32
33
34
35
36
37
38
39
40
41
42
43
44
45
46
47
48
49
50
51
52
53
54
55
56
57
58
59
60
61
62
63
64
65
66
67
68
69
70
71
72
73
74
75
76
77
78
79
80
81
82
83
84
85
86
87
88
89
90
上面的themeConfig作用是自定义主题。和themeConfig同级的字段是App Configs,相当于全局配置。下面还有一个Frontmatter Configs。
它可以单独配置每个markdown文件,它写在每个markdown文件的最前面,比如这样:
markdown
---
title: Docs with VitePress
editLink: true
---
1
2
3
4
2
3
4
在这个markdown文件里可以这样调用字段值:
markdown
{{ $frontmatter.title }}
1
下面列举Frontmatter Configs的所有字段
markdown
---
title: 标签的标题
titleTemplate: 标题的后缀
description: 页面描述
head:
  - - meta
    - name: description
      content: 指定要注入的额外head标签
  - - meta
    - name: keywords
      content: super duper SEO
lastUpdated: false # 在此页面是否显示Last Updated文本
layout: doc # 提供默认文档样式
aside: false # 右边的目录是否显示
outline: xxx # 同AppConfig的outline
---
1
2
3
4
5
6
7
8
9
10
11
12
13
14
15
16
2
3
4
5
6
7
8
9
10
11
12
13
14
15
16
markdown
# 给主页使用的布局,一种和vitepress主页相同布局
layout: home
hero:
  name: VitePress
  text: Vite & Vue powered static site generator.
  tagline: Lorem ipsum...
  actions:
    - theme: brand
      text: Get Started
      link: /guide/what-is-vitepress
    - theme: alt
      text: View on GitHub
      link: https://github.com/vuejs/vitepress
1
2
3
4
5
6
7
8
9
10
11
12
13
2
3
4
5
6
7
8
9
10
11
12
13
markdown
# 给主页使用的布局,主要描述特性
layout: home
features:
  - icon: ⚡️
    title: Vite, The DX that can't be beat
    details: Lorem ipsum...
  - icon: 🖖
    title: Power of Vue meets Markdown
    details: Lorem ipsum...
  - icon: 🛠️
    title: Simple and minimal, always
    details: Lorem ipsum...
1
2
3
4
5
6
7
8
9
10
11
12
2
3
4
5
6
7
8
9
10
11
12
markdown
layout: page # 当前页面没有样式
1
步骤3:部署
本地先测试
先
shell
yarn docs:build
1
后
shell
yarn docs:serve
1
没问题就好
将项目发布到GitHub
根目录下创建.github/workflows/deploy.yml
里面写上
yaml
name: Deploy

on:
  push:
    branches:
      - main

jobs:
  deploy:
    runs-on: ubuntu-latest
    steps:
      - uses: actions/checkout@v3
        with:
          fetch-depth: 0
      - uses: actions/setup-node@v3
        with:
          node-version: 16
          cache: yarn
      - run: yarn install --frozen-lockfile

      - name: Build
        run: yarn docs:build

      - name: Deploy
        uses: peaceiris/actions-gh-pages@v3
        with:
          github_token: ${{ secrets.GITHUB_TOKEN }}
          publish_dir: docs/.vitepress/dist
          # cname: example.com # if wanna deploy to custom domain
1
2
3
4
5
6
7
8
9
10
11
12
13
14
15
16
17
18
19
20
21
22
23
24
25
26
27
28
29
2
3
4
5
6
7
8
9
10
11
12
13
14
15
16
17
18
19
20
21
22
23
24
25
26
27
28
29
注意提交的分支这里是main,如果是master,则进行修改
添加好之后,正常push到GitHub,在GitHub的本项目的setting页面,将Branch切换到gh-pages,如下:
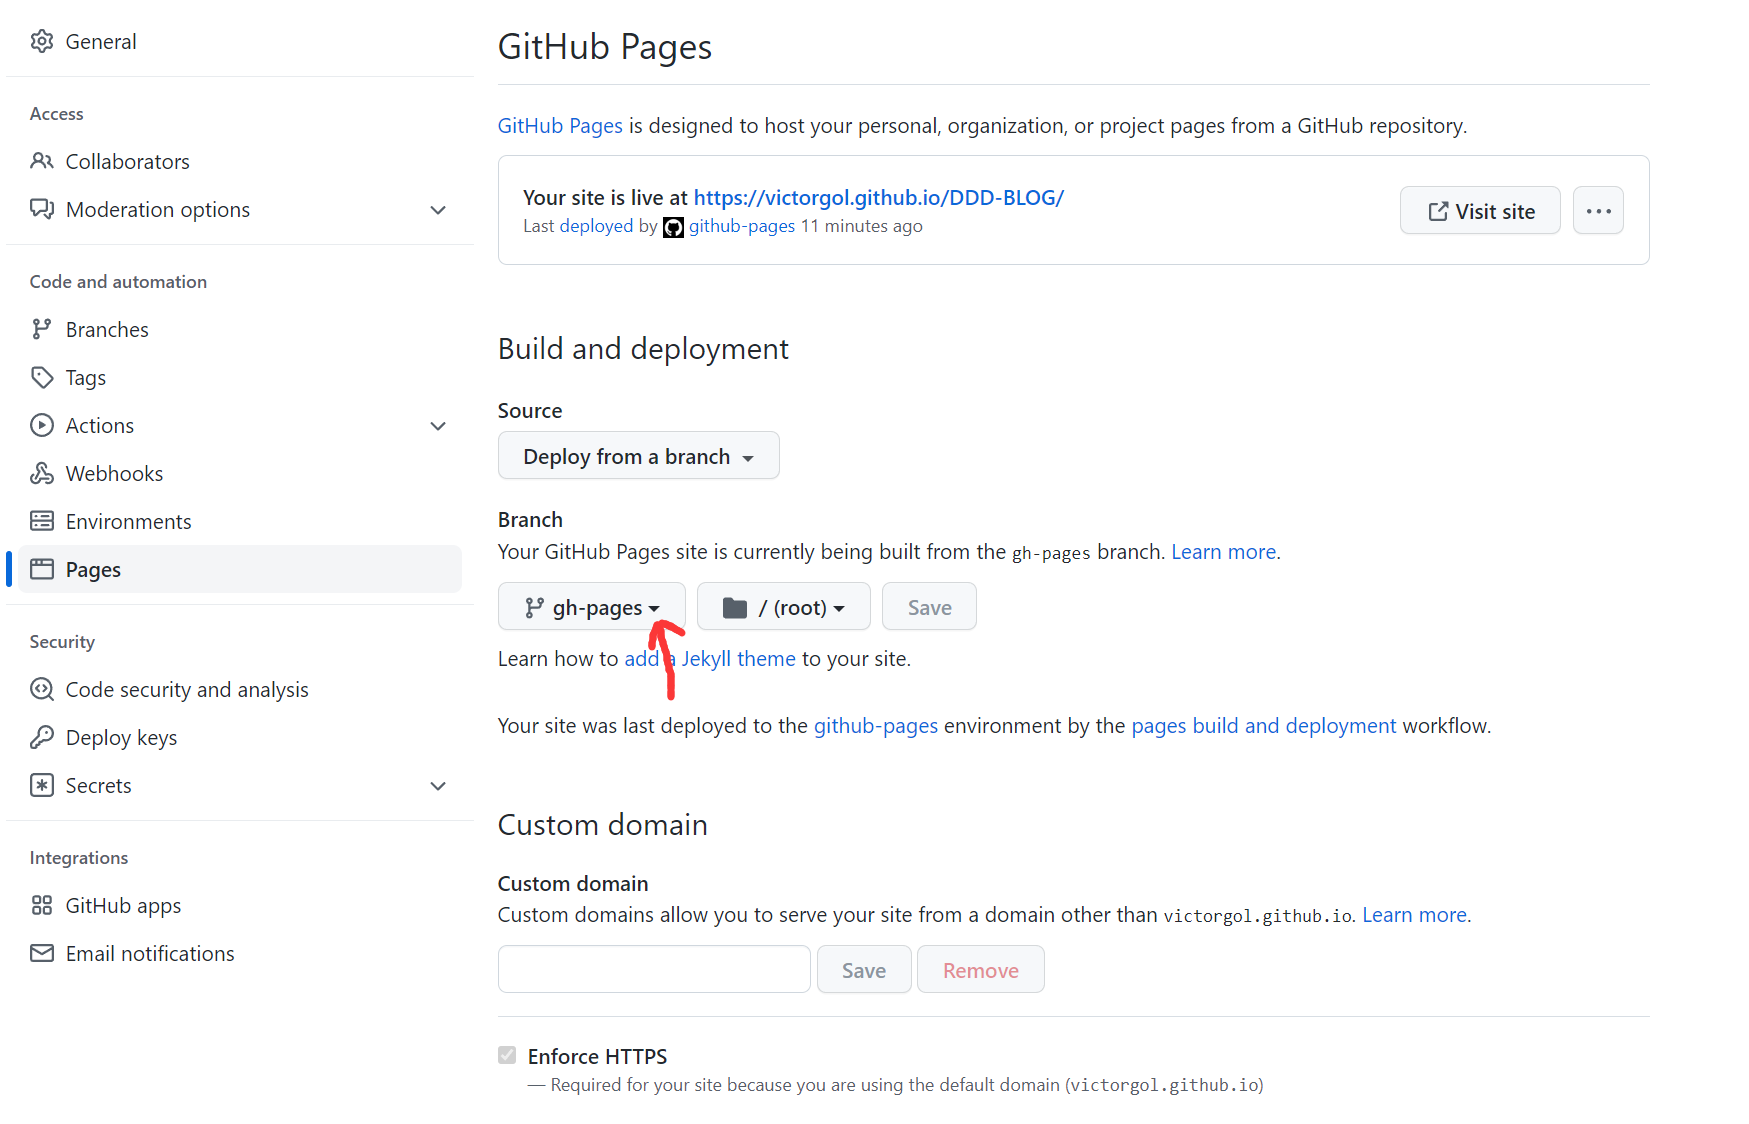
这样,之后每一次push都会自动部署,部署后博客的网址为:https://victorgol.github.io/DDD-BLOG/,格式https://<username>.github.io/<repo>/